
Cardboard Makhar for Ganesh Chaturthi.
Materials required:
1.
Cardboard sheet- There is one type of cardboard
called File paper. Use that as it is thin for making the pillars. Rs. 18
X2= Rs.36
2.
A small waste cardboard box for the stand and a
big waste cardboard sheet for the Makhar ceiling.
3.
Fevicol - Rs. 30
4.
Ruler
5.
Scissors
6.
Cutter
7.
Pencil and eraser
8.
Decorative paper or handmade paper. Rs. 30-40
9.
Waste newspaper.
10.
Paints for decorating.
11.
Acrylic colour of your choice. Rs. 18
12.
Painting brush
13.
Small stones to help balance the pillars
Total cost = Rs. 124
Process:
1.
Take the File paper, divide it into half.
2.
Keep the height as it is, which might be 15
inches and make 8 divisions about 4 cm apart using the ruler. This would be our
marking for folding the sheet.

.JPG)
3.
Take the help of the ruler and guide the scissor
or the cutter along the lines drawn 4 cm apart to make indents. Make sure you don’t
slice the file paper fully. We just have to make the indents so that we can
fold it.
.JPG)
4. Now fold the sheet along the indents. Make sure
you don’t break the sheet.
.jpg)
5.
After the Pillar is ready, use fevicol to paste
the two parts of the Septagon together. Make another one similarly.


6.
Now take the small cardboard box and place the
pillars which are ready on top to see if they will fit into it. Otherwise you
will have to get some other bigger box.

7.
Divide the box into half. Place the pillar on
top of it and draw out its edges. Cut the shape drawn using a cutter.
8.
Do this for both boxes.
9.
Now fit the pillars inside the boxes.


10.
First make an estimate of the length of the
makhar ceiling that you are going to make. Make any design you wish for the
makhar on a sheet of newspaper, make only half of it. Cut it.

1.
Now take the bigger waste cardboard sheet. Make an estimate of whether the stencil of the
makhar is going to fit on both side of the cardboard. Trace the design on one
half of the cardboard. Invert the design
and trace it on the other side. It has to be an exact match.


12.
Cut the design. Now keep the cardboard cutout on
the decorative paper. Trace it. Cut the paper and paste it on the cardboard
using fevicol.


13.
Now take the waste scrap from the decorative
paper, cut a design out of it which can be pasted on the pillars. Fold it in
such a way that only the edge of the design can be stuck to the pillar. Use
fevicol to stick it.


14.
If you wish, draw some designs on the pillars,
paint it.


15. Make some more designs from the scrap paper, stick it on the pillars. (On hindsight, take another sheet of decorative paper, stick it to the pillars entirely, cover the pillars with the paper. Then make designs on them.)
.JPG)
.JPG)
16.
Use all the waste scrap of decorative paper and
stick it on the boxes stuck to the pillars at the bottom. Cover them
completely. Its ok if they look untidy in the beginning, use scissors to give
shape and flatten the small bits.


17. Now draw any design you like on the makhar ceiling using a pencil. You can even make a stencil and then paint the designs on the makhar instead of using the pencil.
18.
Use acrylic colour to paint the design.
19.
The makhar ceiling is now ready.


20. Take the pillars, keep the makhar ceiling on the
pillars to estimate the place where it will fit and make a small cut on the
front side of the pillar to insert the makhar edge in it.
21.
Do this on both pillars and insert the makhar
edge in the pillars.


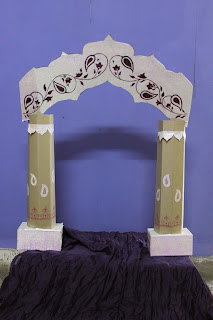
22. Now the decoration is ready. After the makhar ceiling
is inserted, the pillars may wobble. Put some stones in the boxes in the bottom
of the pillars to give it strength.
23.
Now you can put your Ganesha in the decoration.
Tip: Put the Ganesha on inside the Makhar only after
the Puja is complete.

See the second design for our eco-friendly decorations we made in 2013 here


